前言:
java.nio全称java non-blocking IO(实际上是 new io),是指JDK 1.4 及以上版本里提供的新api(New IO) ,为所有的原始类型(boolean类型除外)提供缓存支持的数据容器,使用它可以提供非阻塞式的高伸缩性网络。本文主要全面 & 详细解析Java New IO,希望对于学习NIO能有帮助~
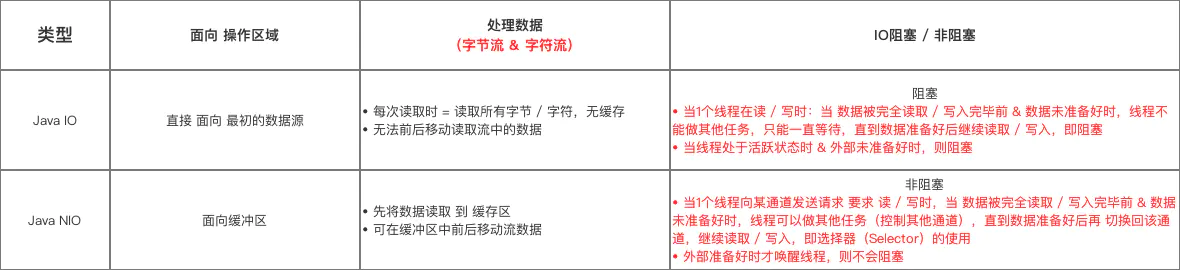
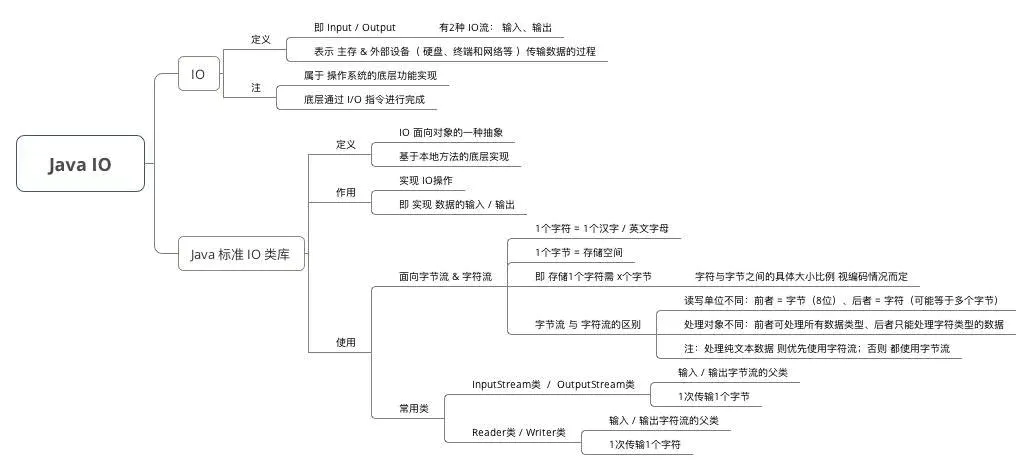
Java IO
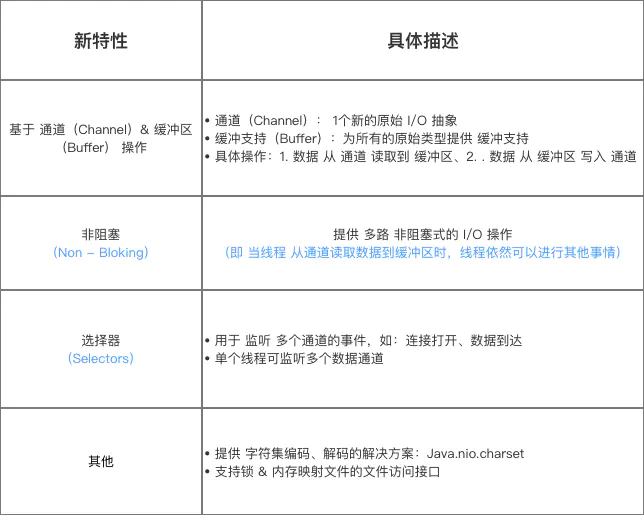
新特性
对比于 Java IO,NIO具备的新特性如下
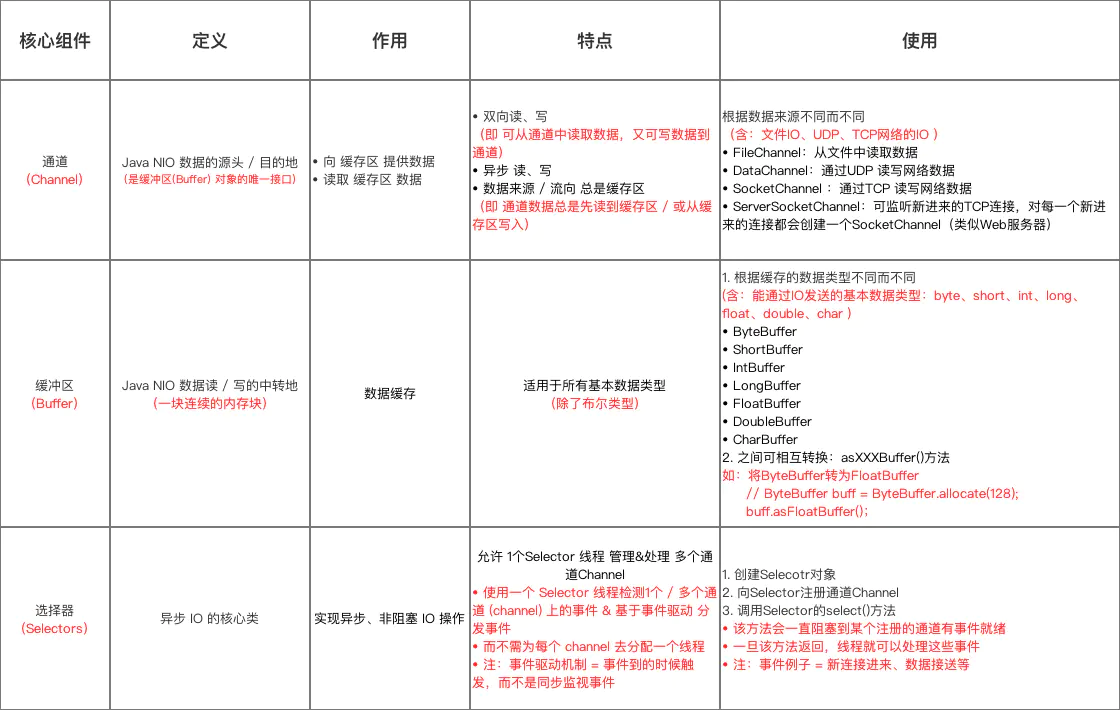
核心组件
Java NIO的核心组件 包括:
- 通道(
Channel) - 缓冲区(
Buffer) - 选择器(
Selectors)
具体使用
基于通道 & 缓冲数据
具体步骤如下:
  // 1. 获取数据源 和 目标传输地的输入输出流(此处以数据源 = 文件为例)
    FileInputStream fin = new FileInputStream(infile);
    FileOutputStream fout = new FileOutputStream(outfile);

    // 2. 获取数据源的输入输出通道
    FileChannel fcin = fin.getChannel();
    FileChannel fcout = fout.getChannel();

    // 3. 创建 缓冲区 对象:Buffer(共有2种方法)
     // 方法1:使用allocate()静态方法
     ByteBuffer buff = ByteBuffer.allocate(256);
     // 上述方法创建1个容量为256字节的ByteBuffer
     // 注:若发现创建的缓冲区容量太小,则重新创建一个大小合适的缓冲区

    // 方法2:通过包装一个已有的数组来创建
     // 注:通过包装的方法创建的缓冲区保留了被包装数组内保存的数据
     ByteBuffer buff = ByteBuffer.wrap(byteArray);

     // 额外:若需将1个字符串存入ByteBuffer,则如下
     String sendString="你好,服务器. ";
     ByteBuffer sendBuff = ByteBuffer.wrap(sendString.getBytes("UTF-16"));

    // 4. 从通道读取数据 & 写入到缓冲区
    // 注:若 以读取到该通道数据的末尾,则返回-1
    fcin.read(buff);

    // 5. 传出数据准备:将缓存区的写模式 转换->> 读模式
    buff.flip();

    // 6. 从 Buffer 中读取数据 & 传出数据到通道
    fcout.write(buff);

    // 7. 重置缓冲区
    // 目的:重用现在的缓冲区,即 不必为了每次读写都创建新的缓冲区,在再次读取之前要重置缓冲区
    // 注:不会改变缓冲区的数据,只是重置缓冲区的主要索引值
    buff.clear();
基于选择器(Selecter)
具体Server代码如下:
public class Server implements Runnable{
    private Selector selector; //多路复用器
    private ByteBuffer readBuf = ByteBuffer.allocate(1024); //缓冲区
    public Server(int port){ //构造函数
        try {
            //1、打开多路复用器
            this.selector = Selector.open();
            //2、打开服务器通道
            ServerSocketChannel ssc = ServerSocketChannel.open();
            //3、服务器通道记得设置为feizuse
            ssc.configureBlocking(false);
            //4、服务器通道绑定地址
            SocketAddress local = new InetSocketAddress(port);
            ssc.bind(local);
            //5、将服务器通道注册到多路复用器那,并且监听阻塞事件
            ssc.register(this.selector, SelectionKey.OP_ACCEPT);
            System.out.println("服务器已经启动,端口号为:"+port);
        } catch (IOException e) {
            e.printStackTrace();
        }
    }

    @Override
    public void run() {
        while(true){ //一直循环,让多路复用器一直监听
            try {
                //1、让多路复用器开始监听(必须的)
                this.selector.select();
                //2、返回多路复用器已经选择的结果集
                Set<SelectionKey> keys= this.selector.selectedKeys();
                //3、遍历结果集,进行处理
                Iterator<SelectionKey> ite = keys.iterator();
                while(ite.hasNext()){
                    SelectionKey key = ite.next();
                    //获取后直接从容器中移出就可以了
                    ite.remove();
                    if(key.isValid()){//如果key是有效的
                        if(key.isAcceptable()){ //如果key为阻塞状态(这个和注册的时候绑定的状态对应)
                            this.accept(key);
                        }
                        if(key.isReadable()){  //如果是可读状态
                            this.read(key);
                        }
                    }
                }
            } catch (IOException e) {
                e.printStackTrace();
            }
        }

    }

    private void accept(SelectionKey key) {

        try {
             // 先获取服务器通道
            ServerSocketChannel ssc = (ServerSocketChannel) key.channel();
            //调用服务器端的accpet方法获取客户端通道
            SocketChannel sc = ssc.accept();
            //设置为非阻塞
            sc.configureBlocking(false);
            //将客户端通道注册到多路复用器中
            sc.register(this.selector,SelectionKey.OP_READ);
        } catch (IOException e) {
            e.printStackTrace();
        }
    }

    /**
     * 这个方法是读取客户端发送给服务端的数据的。因为客户端通道注册时的注册状态为read
     * @param key
     */
    private void read(SelectionKey key) {

        try {
            //1、先清空缓冲区,防止有上一次的读数据
            this.readBuf.clear();
            //2、获取客户端通道
            SocketChannel sc = (SocketChannel) key.channel();
            //3、看客户端是否有输入
            int count = sc.read(this.readBuf);
            if(count == -1){//如果没有数据
                sc.close();
                key.cancel();
            }
            //4、如果有数据则进行读取,读取之前记得要进行缓冲区复位。
            this.readBuf.flip();
            //5、根据缓冲区的数据长度创建对应大小的byte数组,接受缓冲区的数据
            byte[] data = new byte[this.readBuf.remaining()];
            //6、将缓冲区数据弄到byte数组里面
            this.readBuf.get(data);
            //7、将byte数组转为字符串打印出来
            String result = new String(data);
            System.out.println("Server接受到client的数据:"+result);
        } catch (IOException e) {
            e.printStackTrace();
        }
    }

    public static void main(String[] args) {
//开启一个线程,保证多路复用器一直在轮询
        new Thread(new Server(8765)).start();
    }
}
具体Client代码如下:
public class Client {
    public static void main(String[] args){

        try {
            //1、创建以一个客户端通道
            SocketChannel sc = SocketChannel.open();
            //这里是服务器端的IP地址和端口号
            InetSocketAddress add = new InetSocketAddress("127.0.0.1", 8765);
            //客户端通道连接服务器端通道
            sc.connect(add);
            //定义缓冲区,拿来接收用户的输入
            ByteBuffer buf = ByteBuffer.allocate(1204);
            while(true){  //死循环,用户可以无限输入
                //定义一个字节数组,然后使用系统的输入功能
                byte[] bytes = new byte[1024];
                System.in.read(bytes);
                //将数据放入缓冲区
                buf.put(bytes);
                //记得进行复位操作
                buf.flip();
                //写出数据
                sc.write(buf);
                //清空缓冲区
                buf.clear();
            }
        } catch (IOException e) {
            // TODO Auto-generated catch block
            e.printStackTrace();
        }
    }
}
实例解析
- 实例说明:实现文件复制功能
- 实现方式:通道
FileChannel、 缓冲区ByteBuffer
import java.io.FileInputStream;
import java.io.FileOutputStream;
import java.io.IOException;
import java.nio.ByteBuffer;
import java.nio.channels.FileChannel;

public class Test {

    public static void main(String[] args) throws IOException {
        // 设置输入源 & 输出地 = 文件
        String infile = "C:\\old.txt";
        String outfile = "C:\\copy.txt";

        // 1. 获取数据源 和 目标传输地的输入输出流(此处以数据源 = 文件为例)
        FileInputStream fin = new FileInputStream(infile);
        FileOutputStream fout = new FileOutputStream(outfile);

        // 2. 获取数据源的输入输出通道
        FileChannel fcin = fin.getChannel();
        FileChannel fcout = fout.getChannel();

        // 3. 创建缓冲区对象
        ByteBuffer buff = ByteBuffer.allocate(1024);

            //4.将通道的数据存入缓冲区
    while (fcin.read(buff)!=-1){
        //缓冲区切换为读模式
       buff.flip();
        //5.将缓冲区数据写入通道
         fcout.write(buff);
        buffer.clear();
    }
     fcin.close();
    fcout.close();
    fin.close();
    fout.close();

        }
}
与JAVA IO的区别